去年(2017)年分别参加了江苏省和全国的NAO机器人高尔夫比赛,负责的是视觉部分编程。在这里把之前的工作总结一下。内容主要包括红球和黄杆的识别和定位(包括在比赛中遇到的一些问题和解决办法)。完整的代码(C++和Python两个版本)都可以在我的GitHub上 https://github.com/ZhouJiaHuan/nao-golf-visual-task 下载,本篇只以Python代码为例进行介绍。
基本配置(基类)
在代码实现上,为了方便扩展,我先定义了一个基类用来定义一些最基本的配置信息,然后再派生出视觉类(写运动代码也可以派生出一个运动的类)、用于红球黄和黄杆的检测。基类的定义如下:
1 | # date: 1/15/2017 |
从代码中可以看出,ConfigureNao这个基类中主要包含了一些基本配置信息,如IP,端口号,并且创建了一些需要用到的NAO库中自带的类的对象(视觉、语音、运动等)。在等会我们定义视觉类的时候,可以直接从ConfigureNao这个类继承。
视觉模块
视觉基类——视觉任务的基类
由于视觉任务中(红球检测、黄杆检测)都需要共用一些基本功能(如从摄像头获取数据),因此再定义一个视觉基类VisualBasis供使用,这个类是从ConfigureNao继承出来的。定义如下:1
2
3
4
5
6
7
8
9
10
11
12
13
14
15
16
17
18
19
20
21
22
23
24
25
26
27
28
29
30
31
32
33
34
35
36
37
38
39
40
41
42
43
44
45
46
47
48
49
50
51
52
53
54
55
56
57
58
59
60
61
62
63
64
65
66
67
68
69
70
71
72
73
74
75
76
77
78
79
80
81
82
83
84
85
86
87
88
89
90
91
92
93
94
95
96
97
98
99
100
101class VisualBasis(ConfigureNao):
"""
a basic class for visual task.
"""
def __init__(self, IP, cameraId, resolution=vd.kVGA):
"""
initilization.
Args:
IP: NAO's IP
cameraId: bottom camera (1,default) or top camera (0).
resolution: kVGA, default: 640*480)
Return: none
"""
super(VisualBasis, self).__init__(IP)
self._cameraId = cameraId
self._resolution = resolution
self._colorSpace = vd.kBGRColorSpace
self._fps = 20
self._frameHeight = 0
self._frameWidth = 0
self._frameChannels = 0
self._frameArray = None
self._cameraPitchRange = 47.64/180*np.pi
self._cameraYawRange = 60.97/180*np.pi
self._cameraProxy.setActiveCamera(self._cameraId)
def updateFrame(self, client="python_client"):
"""
get a new image from the specified camera and save it in self._frame.
Args:
client: client name.
Return: none.
"""
"""
if self._cameraProxy.getActiveCamera() == self._cameraId:
print("current camera has been actived.")
else:
self._cameraProxy.setActiveCamera(self._cameraId)
"""
self._videoClient = self._cameraProxy.subscribe(client, self._resolution, self._colorSpace, self._fps)
frame = self._cameraProxy.getImageRemote(self._videoClient)
self._cameraProxy.unsubscribe(self._videoClient)
try:
self._frameWidth = frame[0]
self._frameHeight = frame[1]
self._frameChannels = frame[2]
self._frameArray = np.frombuffer(frame[6], dtype=np.uint8).reshape([frame[1],frame[0],frame[2]])
except IndexError:
raise
def getFrameArray(self):
"""
get current frame.
Return:
current frame array (numpy array).
"""
if self._frameArray is None:
return np.array([])
return self._frameArray
def showFrame(self):
"""
show current frame image.
"""
if self._frameArray is None:
print("please get an image from Nao with the method updateFrame()")
else:
cv2.imshow("current frame", self._frameArray)
def printFrameData(self):
"""
print current frame data.
"""
print("frame height = ", self._frameHeight)
print("frame width = ", self._frameWidth)
print("frame channels = ", self._frameChannels)
print("frame shape = ", self._frameArray.shape)
def saveFrame(self, framePath):
"""
save current frame to specified direction.
Arguments:
framePath: image path.
"""
cv2.imwrite(framePath, self._frameArray)
print("current frame image has been saved in", framePath)
def setParam(self, paramName=None, paramValue = None):
raise NotImplementedError
def setAllParamsToDefault(self):
raise NotImplementedError
视觉基类中除了定义了一些默认的摄像头参数,还定义了一些基本的成员函数、包括从指定摄像头获取一帧图像、返回当前存储的图像数据、显示当前图像、保存当前图像到本地,还有一些以后用到再定义的函数,先预留借口在这里。因为这个类中都是一些简单的功能,此处不多介绍。
有了上面定义的视觉类,就可以继续派生出红球检测类和黄杆检测类,下面分别介绍。
红球检测类
其实NAO的官方库里面提供了红球识别的API,但我们测试过,发现效果很不好,非常容易受到一些干扰物的影响。因此我们打算基于OpenCV自己写红球识别的代码。最简单的思路就是颜色阈值分割+霍夫圆检测,然而在测试的时候我们发现仅仅通过这两个步骤检测的结果并不稳定,于是我们在这基础上针对比赛环境做了改进。
红球检测类的类名叫BallDetect,是从VisualBasis类继承出来的,因此已经包含了VisualBasis类中的基本属性和成员函数,我们只要在此基础上继续编写红球检测需要的成员函数即可。
红球基本属性
我们需要保存的红球相关的信息有两块:(1)红球在图像中的位置信息;(2)红球相对于机器人坐标系的位置信息。因此我们先定义这两个属性,如下:
1 | def __init__(self, IP, cameraId=vd.kBottomCamera, resolution=vd.kVGA): |
红球在图像中的位置信息和实际位置信息分别用”_ballData”和”_ballPosition”来存放,初始值都设为0
图像预处理
该函数功能是对图像进行特定通道的分离和滤波,这里我分别针对RGB空间和HSV空间都写了预处理函数供调用.
RGB空间预处理函数1
2
3
4
5
6
7
8
9
10
11
12
13
14
15
16
17
18
19
20
21
22
23
24
25
26
27
28
29
30
31
32
33
34
35
36
37
38
39
40
41
42
43
44
45
46
47
48
49
50
51def _getChannelAndBlur(self, color):
"""
get the specified channel and blur the result.
Arguments:
color: the color channel to split, only supports the color of red, geen and blue.
Return:
the specified color channel or None (when the color is not supported).
"""
try:
channelB = self._frameArray[:,:,0]
channelG = self._frameArray[:,:,1]
channelR = self._frameArray[:,:,2]
except:
raise Exception("no image detected!")
Hm = 6
if color == "red":
channelB = channelB*0.1*Hm
channelG = channelG*0.1*Hm
channelR = channelR - channelB - channelG
channelR = 3*channelR
channelR = cv2.GaussianBlur(channelR, (9,9), 1.5)
channelR[channelR<0] = 0
channelR[channelR>255] = 255
return np.uint8(np.round(channelR))
elif color == "blue":
channelR = channelR*0.1*Hm
channelG = channelG*0.1*Hm
channelB = channelB - channelG - channelR
channelB = 3*channelB
channelB = cv2.GaussianBlur(channelB, (9,9), 1.5)
channelB[channelB<0] = 0
channelB[channelB>255] = 255
return np.uint8(np.round(channelB))
elif color == "green":
channelB = channelB*0.1*Hm
channelR= channelR*0.1*Hm
channelG = channelG - channelB - channelR
channelG = 3*channelG
channelG = cv2.GaussianBlur(channelG, (9,9), 1.5)
channelG[channelG<0] = 0
channelG[channelG>255] = 255
return np.uint8(np.round(channelG))
else:
print("can not recognize the color!")
print("supported color:red, green and blue.")
return None
虽然说是红球检测,但为了考虑代码的一般性,我也增加了绿色和蓝色。在分离的时候增强了红色通道的值并削减了其他空间的结果,这样可以使分离的结果更好。另外增加高斯滤波让局部信息模糊有利于霍夫圆的检测。
HSV空间预处理函数1
2
3
4
5
6
7
8
9
10
11
12
13
14
15
16
17
18
19
20
21
22
23
24
25def _binImageHSV(self, color):
"""
get binary image from the HSV image (transformed from BGR image)
Args:
color: the color for binarization.
Return:
binImage: binary image.
"""
try:
frameArray = self._frameArray.copy()
imgHSV = cv2.cvtColor(frameArray, cv2.COLOR_BGR2HSV)
except:
raise Exception("no image detected!")
if color == "red":
minHSV1=np.array([0,43,46])
maxHSV1=np.array([10,255,255])
minHSV2=np.array([156,43,46])
maxHSV2=np.array([180,255,255])
frameBin1 = cv2.inRange(imgHSV, minHSV1, maxHSV1)
frameBin2 = cv2.inRange(imgHSV, minHSV2, maxHSV2)
frameBin = np.maximum(frameBin1, frameBin2)
return frameBin
else:
raise Exception("not recognize the color!")
这个函数的输入依然是一个RGB空间图像,内部转换为HSV空间进行处理。这里用到了OpenCV库中的inRange()函数进行二值化,由于红色对应的HSV的区间范围有两个,所以在代码实现上用了“并”操作。函数实现上只提供了红色的提取,但也可以拓展到其他颜色的预处理,这里给出一个各个颜色HSV空间的实验取值范围: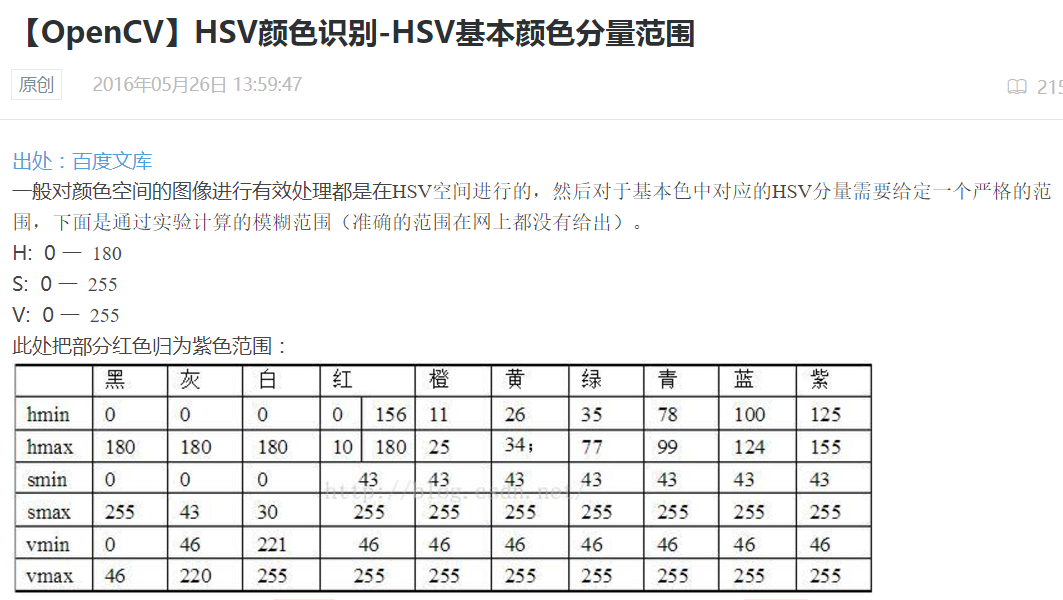
在实验测试的时候,发现在一般的情况下,两个空间都能准确地把红球分割出来,但在光线条件较差的时候(较强或较弱),发现HSV空间更加稳定。
红球识别
图像预处理后,图像上会分割出红球所在区域和其他的一些噪声。理想情况下,红球所在的区域分割结果应该是一个圆(椭圆),这里我是直接通过OpenCV库中的霍夫圆检测函数实现的:1
2
3
4
5
6
7
8
9
10
11
12
13
14
15
16
17
18
19def _findCircles(self, img, minDist, minRadius, maxRadius):
"""
detect circles from an image.
Arguments:
img: image to be detected.
minDist: minimum distance between the centers of the detected circles.
minRadius: minimum circle radius.
maxRadius: maximum circle radius.
Return: an uint16 numpy array shaped circleNum*3 if circleNum>0, ([[circleX, circleY,radius]])
else return None.
"""
circles = cv2.HoughCircles(np.uint8(img), cv2.HOUGH_GRADIENT, 1, minDist,
param1=150, param2=15, minRadius=minRadius, maxRadius=maxRadius)
if circles is None:
return np.uint16([])
else:
return np.uint16(np.around(circles[0, ]))
根据比赛用球的大小要求可以大概限制一下红球在图像中的半径范围(和分辨率有关),代码中的参数是基于640×480的分辨率设置的。需要注意的是,经过上述霍夫圆检测到的球可能有多个(可能包含了一些噪声),因此还应该对结果进一步的判断。
红球筛选
经过红球识别的结果可能有如下2种情况:
- 图像中没有检测到球。
- 图像中检测到一个或者多个球。
第一种情况不需要讨论,只需要返回没有球的信息即可。对于第二种情况,我们需要对每一个检测出的红球进行二次判断。因为在比赛现场,NAO机器人最多只应该检测到一个球。因此,针对第二种情况,我给出的筛选方法如下:
对于每一个检测出的红球,以红球圆心为中心,以红球的4倍半径为边长画一个外围正方形,计算外接正方形区域内红色和绿色像素点所占的比值。一个简单的示意图如下:
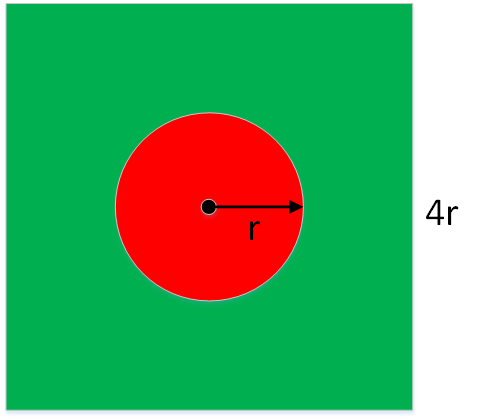
最理想的情况下,红色像素的比例为$\pi r^2/16r^2=0.196$,绿色像素所占的比例为$0.804$,但在实际检测的时候,存在各种不确定因素(圆检测误差、光线不均匀导致颜色信息发生变化、其他干扰物的影响等),几乎不可能达到理想情况。因此,在具体的实现上,我们需要把条件设定得宽松点。实现代码如下:1
2
3
4
5
6
7
8
9
10
11
12
13
14
15
16
17
18
19
20
21
22
23
24
25
26
27
28
29
30
31
32
33
34
35
36
37
38
39
40
41
42
43
44
45
46
47
48
49
50
51
52
53
54
55
56
57def _selectCircle(self, circles):
"""
select one circle in list type from all circles detected.
Args:
circles: numpy array shaped (N, 3), N is the number of circles.
Return:
selected circle or None (no circle is selected).
"""
if len(circles) == 0 :
return circles
if circles.shape[0] == 1:
centerX = circles[0][0]
centerY = circles[0][1]
radius = circles[0][2]
initX = centerX - 2*radius
initY = centerY - 2*radius
if initX<0 or initY<0 or (initX+4*radius)>self._frameWidth or (initY+4*radius)>self._frameHeight or radius<1:
return circles
channelB = self._frameArray[:,:,0]
channelG = self._frameArray[:,:,1]
channelR = self._frameArray[:,:,2]
rRatioMin = 1.0; circleSelected = np.uint16([])
for circle in circles:
centerX = circle[0]
centerY = circle[1]
radius = circle[2]
initX = centerX - 2*radius
initY = centerY - 2*radius
if initX<0 or initY<0 or (initX+4*radius)>self._frameWidth or (initY+4*radius)>self._frameHeight or radius<1:
continue
rectBallArea = self._frameArray[initY:initY+4*radius+1, initX:initX+4*radius+1,:]
bFlat = np.float16(rectBallArea[:,:,0].flatten())
gFlat = np.float16(rectBallArea[:,:,1].flatten())
rFlat = np.float16(rectBallArea[:,:,2].flatten())
rScore1 = np.uint8(rFlat>1.0*gFlat)
rScore2 = np.uint8(rFlat>1.0*bFlat)
rScore = float(np.sum(rScore1*rScore2))
gScore = float(np.sum(np.uint8(gFlat>1.0*rFlat)))
rRatio = rScore/len(rFlat)
gRatio = gScore/len(gFlat)
print("red ratio = ", rRatio)
print("green ratio = ", gRatio)
if rRatio>=0.12 and gRatio>=0.1 and abs(rRatio-0.19)<abs(rRatioMin-0.19):
circleSelected = circle
return circleSelected
该函数的输入是一个2维数组,每一个代表一个检测出来的红球信息$(x, y, r)$,为了保证筛选后最多只剩一个红球,代码最后再所有满足比例条件中的球中选择了红色比例最小的红球(此处还有其他更好的选择方法,但在实验中发现,代码中使用的方法已经可以得到很好的结果。)
还有一点需要说明的是,上面的代码中使用的是RGB空间进行颜色统计的,在实现上其实也可以使用HSV空间进行统计,方法还是一样。一个完整的红球检测过程如下:
红球定位
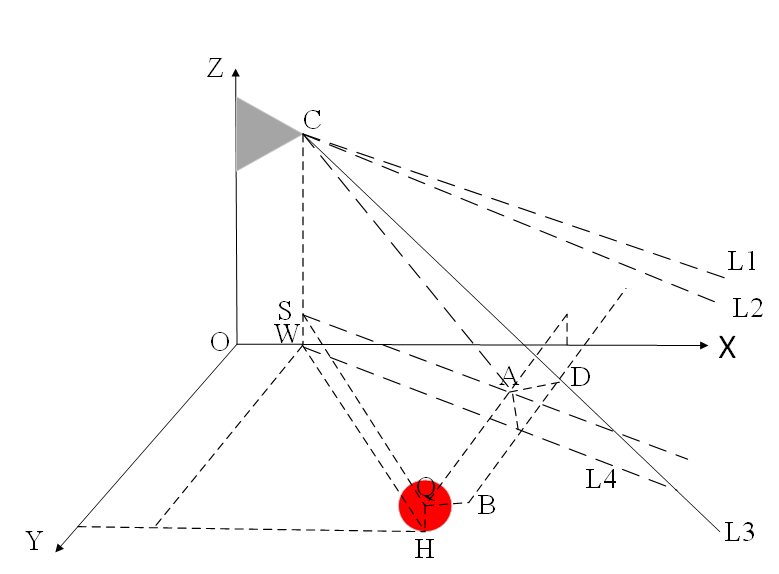
上面只是把红球的位置在图像中定位出来了,而我们在比赛中需要红球相对于机器人(机器人坐标系)的位置信息。比较简单的一种定位方法就是三角函数定位,也就是利用已知的一些参数(红球半径、机器人摄像头离地面高度、摄像头位置、广角等)构造几个直角三角形,最后即可得出红球相当于机器人的位置信息。一个简单的计算示意图如下(具体计算公式见代码):
对应的计算位置的代码如下:1
2
3
4
5
6
7
8
9
10
11
12
13
14
15
16
17
18
19
20
21
22
23
24
25
26
27
28
29
30
31
32
33
34
35
36
37
38
39def _updateBallPosition(self, standState):
"""
compute and update the ball position with the ball data in frame.
standState: "standInit" or "standUp".
"""
bottomCameraDirection = {"standInit":49.2/180*np.pi, "standUp":39.7/180*np.pi}
try:
cameraDirection = bottomCameraDirection[standState]
except KeyError:
print("Error! unknown standState, please check the value of stand state!")
raise
else:
if self._ballData["radius"] == 0:
self._ballPosition= {"disX":0, "disY":0, "angle":0}
else:
centerX = self._ballData["centerX"]
centerY = self._ballData["centerY"]
radius = self._ballData["radius"]
cameraPos = self._motionProxy.getPosition(self._cameraName, motion.FRAME_WORLD, True)
cameraX, cameraY, cameraHeight = cameraPos[:3]
head_yaw, head_pitch = self._motionProxy.getAngles("Head", True)
camera_pitch = head_pitch + cameraDirection
img_center_x = self._frameWidth/2
img_center_y = self._frameHeight/2
center_x = self._ballData["centerX"]
center_y = self._ballData["centerY"]
img_pitch = (center_y-img_center_y)/(self._frameHeight)*self._cameraPitchRange
img_yaw = (img_center_x-center_x)/(self._frameWidth)*self._cameraYawRange
ball_pitch = camera_pitch + img_pitch
ball_yaw = img_yaw + head_yaw
print("ball yaw = ", ball_yaw/np.pi*180)
dis_x = (cameraHeight-self._ballRadius)/np.tan(ball_pitch) + np.sqrt(cameraX**2+cameraY**2)
dis_y = dis_x*np.sin(ball_yaw)
dis_x = dis_x*np.cos(ball_yaw)
self._ballPosition["disX"] = dis_x
self._ballPosition["disY"] = dis_y
self._ballPosition["angle"] = ball_yaw
代码中前一部分主要是获取计算所需要的信息(传感器的值和常数项),后一部分是红球位置计算公式。最后直接将计算的结果保存在类中。在实验的时候,统计各个位置的平均误差在1-2里面,视野中心的位置误差较小,视野边界附近的误差较大。
这里还需要补充一点的是,之前由于我们代码中的计算公式有误(可对比上下代码的不同),导致计算的位置信息有很大的偏差,具体表现是X方向的距离基本准确,Y方向的距离信息偏小,而且X越小的时候相对偏差越明显。为此,我们通过采集视野中的不同位置信息(采集多次数据取平均),统计各个离散位置的误差信息,最后用多项式对误差进行补偿。在测试的时候发现补偿的结果可以把误差缩小到1厘米左右。代码如下:1
2
3
4
5
6
7
8
9
10
11
12
13
14
15
16
17
18
19
20
21
22
23
24
25
26
27
28
29
30
31
32
33
34
35
36
37
38
39
40
41
42
43
44
45def _updateBallPositionFitting(self, standState):
"""
compute and update the ball position with compensation.
Args:
standState: "standInit" or "standUp".
"""
bottomCameraDirection = {"standInit":49.2, "standUp":39.7}
ballRadius = self._ballRadius
try:
cameraDirection = bottomCameraDirection[standState]
except KeyError:
print("Error! unknown standState, please check the value of stand state!")
raise
else:
if self._ballData["radius"] == 0:
self._ballPosition= {"disX":0, "disY":0, "angle":0}
else:
centerX = self._ballData["centerX"]
centerY = self._ballData["centerY"]
radius = self._ballData["radius"]
cameraPosition = self._motionProxy.getPosition("CameraBottom", 2, True)
cameraX = cameraPosition[0]
cameraY = cameraPosition[1]
cameraHeight = cameraPosition[2]
headPitches = self._motionProxy.getAngles("HeadPitch", True)
headPitch = headPitches[0]
headYaws = self._motionProxy.getAngles("HeadYaw", True)
headYaw = headYaws[0]
ballPitch = (centerY-240.0)*self._cameraPitchRange/480.0 # y (pitch angle)
ballYaw = (320.0-centerX)*self._cameraYawRange/640.0 # x (yaw angle)
dPitch = (cameraHeight-ballRadius)/np.tan(cameraDirection/180*np.pi+headPitch+ballPitch)
dYaw = dPitch/np.cos(ballYaw)
ballX = dYaw*np.cos(ballYaw+headYaw)+cameraX
ballY = dYaw*np.sin(ballYaw+headYaw)+cameraY
ballYaw = np.arctan2(ballY, ballX)
self._ballPosition["disX"] = ballX
# 误差补偿(多项式)
if (standState == "standInit"):
ky = 42.513*ballX**4 - 109.66*ballX**3 + 104.2*ballX**2 - 44.218*ballX + 8.5526
#ky = 12.604*ballX**4 - 37.962*ballX**3 + 43.163*ballX**2 - 22.688*ballX + 6.0526
ballY = ky*ballY
ballYaw = np.arctan2(ballY,ballX)
self._ballPosition["disY"] = ballY
self._ballPosition["angle"] = ballYaw
最后要实现上面的所有功能,在类中再定义一个函数,把之前实现的各个模块封装在一起,如下:1
2
3
4
5
6
7
8
9
10
11
12
13
14
15
16
17
18
19
20
21
22
23
24
25
26
27
28
29
30
31
32
33
34
35
36def updateBallData(self, standState="standInit", color="red", color_space="BGR", fitting=False):
"""
update the ball data with the frame get from the bottom camera.
Arguments:
standState: ("standInit", default), "standInit" or "standUp".
color: ("red", default) the color of ball to be detected.
color_space: "BGR", "HSV".
fittting: the method of localization.
Return:
a dict with ball data. for example: {"centerX":0, "centerY":0, "radius":0}.
"""
self.updateFrame()
#cv2.imwrite("src_image.jpg", self._frameArray)
minDist = int(self._frameHeight/30.0)
minRadius = 1
maxRadius = int(self._frameHeight/10.0)
if color_space == "BGR":
grayFrame = self._getChannelAndBlur(color)
else:
grayFrame = self._binImageHSV(color)
#cv2.imshow("bin frame", grayFrame)
#cv2.imwrite("bin_frame.jpg", grayFrame)
#cv2.waitKey(20)
circles = self._findCircles(grayFrame, minDist, minRadius, maxRadius)
circle = self._selectCircle(circles)
if len(circle) == 0:
self._ballData = {"centerX":0, "centerY":0, "radius":0}
self._ballPosition= {"disX":0, "disY":0, "angle":0}
else:
self._ballData = {"centerX":circle[0], "centerY":circle[1], "radius":circle[2]}
if fitting == True:
self._updateBallPositionFitting(standState=standState)
else:
self._updateBallPosition(standState=standState)
黄杆检测类
在NAO机器人高尔夫中,球洞上会立着一根黄杆用于NAO机器人远程定位球洞的方向。因为NAO机器人的头部摄像头看到距离更远,所以在比赛中会使用NAO机器人的头部摄像头检测黄杆。但这也带来一些问题,比如会把远处一些黄色的东西错认为黄杆。
同样,我们需要定义一个黄杆检测类StickDetect,它也是从视觉基类VisualBasis继承出来的。类中我定义了三个属性:一个列表用来存放检测出来的黄杆的位置信息、一个值用来存放黄杆相对于机器人的角度、一个常数用来确定是否要对图像进行裁剪。前两个很好理解,定义一个裁剪的常用的原因是在比赛现场,当NAO机器人以正常走路的姿势去寻找黄杆时,黄杆一般位于图像的下方,因此将图像上半图像剪掉不但可以排除一些干扰物,还可以减少计算量。具体的定义如下:
1 | def __init__(self, IP, cameraId=vd.kTopCamera, resolution=vd.kVGA): |
在我们的检测方法中,采用HSV颜色分割+形状判别的方式。其中HSV颜色分割和上面用HSV空间进行红球分割是一样的,只要改一下阈值范围就行,函数如下:1
2
3
4
5
6
7
8
9
10
11
12
13
14
15
16
17
18
19
20
21
22
23
24
25
26
27
28def _preprocess(self, minHSV, maxHSV, cropKeep, morphology):
"""
preprocess the current frame for stick detection.(binalization, crop etc.)
Arguments:
minHSV: the lower limit for binalization.
maxHSV: the upper limit for binalization.
cropKeep: crop ratio (>=0.5).
morphology: erosion and dilation.
Return:
preprocessed image for stick detection.
"""
self._cropKeep = cropKeep
frameArray = self._frameArray
height = self._frameHeight
width = self._frameWidth
try:
frameArray = frameArray[int((1-cropKeep)*height):,:]
except IndexError:
raise
frameHSV = cv2.cvtColor(frameArray, cv2.COLOR_BGR2HSV)
frameBin = cv2.inRange(frameHSV, minHSV, maxHSV)
kernelErosion = np.ones((5,5), np.uint8)
kernelDilation = np.ones((5,5), np.uint8)
frameBin = cv2.erode(frameBin, kernelErosion, iterations=1)
frameBin = cv2.dilate(frameBin, kernelDilation, iterations=1)
frameBin = cv2.GaussianBlur(frameBin, (9,9), 0)
return frameBin
另外,在代码中我还加入了腐蚀膨胀和高斯滤波。这主要是在实验中发现,当黄杆离机器人比较远的时候,一些干扰物对检测的影响很大,加入腐蚀膨胀可以很好地滤除大量不必要的干扰。当然滤波器的大小也需要把握好,否则可能会把黄杆也滤除。
图片经上面的预处理后,会得到一张二值化图。理想情况下,应主要包含黄杆信息(可能包含一些颜色相似的噪声)。为此我们需要在二值化图像中找到黄杆所在的位置。由于我们比赛用的黄杆是长条形,可以进一步借助形状信息来判断。我在代码中用的判别方法如下:
先在二值化图像上进行凸包检测,移除面积或周长较小的凸包,找到剩下凸包的最小包围矩形框,对每个外接矩形框进行形状判别,保留长宽比符合要求的矩形框,最后在剩下的矩形框中选择长宽比最大的矩形框。代码如下:1
2
3
4
5
6
7
8
9
10
11
12
13
14
15
16
17
18
19
20
21
22
23
24
25
26
27
28
29
30
31
32
33
34
35
36def _findStick(self, frameBin, minPerimeter, minArea):
"""
find the yellow stick in the preprocessed frame.
Args:
frameBin: preprocessed frame.
minPerimeter: minimum perimeter of detected stick.
minArea: minimum area of detected stick.
Return: detected stick marked with rectangle or [].
"""
rects = []
_, contours, _ = cv2.findContours(frameBin, cv2.RETR_EXTERNAL, cv2.CHAIN_APPROX_NONE)
if len(contours) == 0:
return rects
for contour in contours:
perimeter = cv2.arcLength(contour, True)
area = cv2.contourArea(contour)
if perimeter>minPerimeter and area>minArea:
x,y,w,h = cv2.boundingRect(contour)
rects.append([x,y,w,h])
if len(rects) == 0:
return rects
rects = [rect for rect in rects if (1.0*rect[3]/rect[2])>0.8]
if len(rects) == 0:
return rects
rects = np.array(rects)
print(rects)
rect = rects[np.argmax(1.0*(rects[:,-1])/rects[:,-2]),]
rect[1] += int(self._frameHeight *(1-self._cropKeep))
return rect
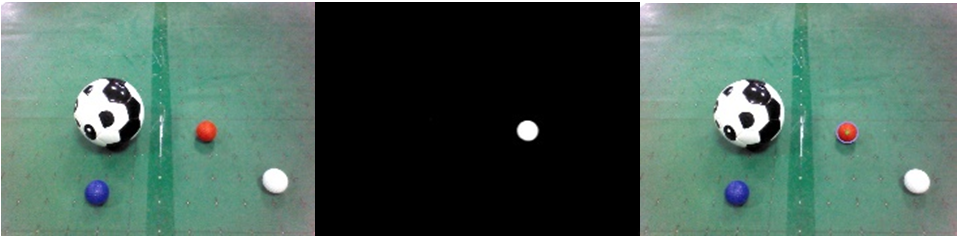
上面的代码中还加入和很多判断。目的是为了当图像中没有我们需要的黄杆时,直接返回一个空的列表。还有需要注意的一点是,最后我们是在经过裁剪的图像上进行检测的,因此还需要把最终的坐标信息转换的到原图中。下面给出一个完整的黄杆检测结果图: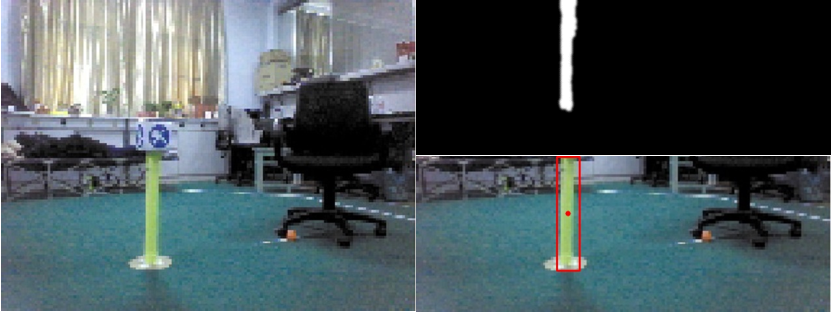
至此,我们已经实现了NAO机器人高尔夫比赛中红球和黄杆的识别和定位。其实比赛场地上还有其他的目标需要检测,如白线、障碍物甚至球洞,这里就不多介绍。
写在最后的话:
感谢你一直读到这里,希望本篇博客对你有点帮助。关于本篇博客中的任何问题欢迎指出,虚心接受各位大佬的教导!